Tuesday, March 17, 2015

Reconditioning Terrain - part two

Welcome back!  For this second and final instalment I'll show you how to make the newly reconditioned hills (or terrain of your choice) look they belong on your battlefield.  (Well, on my battlefield, but you get the idea)

Since it's the day after the sand and glue treatment, the glue should be completely polymerized, and fully hard.  Don't be surprised if the underlying colour is showing through.  PVA (or white) glue dries clear, so being able to see through to the underlying colour is normal.  When mine were dry, here's what they looked like:


Again, gather your materials and clear some space.  While not as messy as the glue and sand part, expect some drips and general painting mess.  

For materials, you'll need:
  • Paintbrush - same as before.
  • Black paint - this will be the basecoat, so something that will cover well is ideal.  I long ago bought a quart of matte black interior latex at Rona (or Home Depot for those south of 49).  Cheap and covers well, and the quart will last a long time.
  • Two brown paints - one will be the brown base, the other will serve to mix as the highlight.  In this case, I used 'Folk Art' brand Nutmeg Brown as the base, and Toffee as the highlight colour.  Your preference may be different, such as a light sandy colour, a reddish, Mars-like colour, or whatever you painted your models' bases.
  • Mixing tray - to cut the paint with water just a bit, and for the highlight mix.
Once you have everything assembled, give your terrain a good coat of black.  Just as the glue and sand mix sealed and protected the styrofoam underneath, this coat of paint seals the glue against moisture that can soften the PVA glue.


This coat is the most important for sealing, so you want to make sure it's thorough.  Depending on the cragginess of your terrain, this may take a while.  Make sure you get paint in every nook and cranny.  Not only does it protect and seal up the glue mix, it ensures that aesthetically, you've got colour everywhere on the piece.


Again, I've used the spacers to keep the piece elevated to prevent any paint at the edges from sticking to the newspaper.  For some other pieces I made a while ago I painted the bottom as well, just to seal it all, but here I've only gone under at the edges, to make sure there's no visible styrofoam when the terrain is in play.


Once you have them all painted, they need to sit and dry fully.  When I say fully, I mean it.  If you start the next layer too soon, then the black will start to run into the brown.  Patience, young Padawan, patience.  Since I had other things to do the rest of the day, I put them all back on the shelf and left them overnight.  This is one advantage of bulk terrain, you can often work at it for just a short time each day, and when you're done you have lots of stuff ready to go.

Here the black base is dry:


And the black is thoroughly covering the edges right to the bottom:


Now things start to look good.  Take your base brown (or colour of choice) and apply it over the black.  The goal here is thorough coverage.  If a spot is missed, particularly at the sides, the black will show which will look like a small shadow.  Not a big deal but better to get it covered nice and evenly.   


Also, try to vary your brush strokes to avoid a consistent direction.  That will prevent any kind of 'grain' from appearing in your paint.  As well, if you thin it too much, like I did the first coat here, it won't cover and will look more like a wash.


Not so hot looking, but I let them dry and added a second coat.  You may find you need to do this anyway depending on what you choose as a colour.  Lighter colours in particular.  You can also experiment with other base colours.  My stepson made boards for his Protectorate of Menoth army, and used a middle brown latex instead of the black.  Again, don't be afraid to experiment.  For mine, the second coat was the charm and the hills are set out to dry.


The next coat is a mix of the base and the highlight colour.  Again, it's not an exact ratio, rather eyeballing it to get the look you want.  In this case, here's my ratio:


Exact science indeed.  For this coat, you only want to brush the high points and maybe catch part of the flat areas.  Again, you can experiment to get the look you want.  As before, try to avoid a consistent brush direction.


Note the angle of the brush.  I find skimming over the surface can be a good way to avoid putting down too much paint.  I also clean most of the paint off the brush, similar to drybrushing, but not quite as 'dry.'  A third highlight can be done, depending on the look you're after.  Once you're satisfied with them, set them aside to dry.


Don't worry too much if your highlights are a bit heavy.  You can either go back with a bit of base coat, or add some more to make it look more even.  Irregularities in the colour are fine, as the ground outside isn't perfectly one colour either.  That and static grass hides many sins.

Once you're happy with them, and the paint is fully dry, you will need another set of materials:
  • The white glue again, as well as a mixing vessel.
  • A paintbrush.
  • Static grass - this comes in several colours.  For the larger boards, I used different densities of dark green, medium green and hay colours.  For this set of hills, I have a mix of the three (really just the leftovers from terrain boards) that I used for some other hills as well as when basing models.  The choice is yours, based on your colours and the final look.
  • As always, newspaper to catch any glue or drips.

Mix the glue and water in a similar ratio to what you used for the glue and sand process.  It can be a little thinner because you only need to put down enough glue to hold the static grass.  The heavier the coat of glue, the more grass it will catch and hold, so you can vary the density of the grass on your terrain.


I try to do an uneven pattern, covering different amounts of each hill.  Some will be completely covered, others with very little.  Keeping it random-ish helps when you're making modular terrain as it will fit almost anywhere on a matching table.

Next step is to add the static grass.  I put on heaps of it, even though I know most of it won't stick, just to make sure I get full coverage of the areas I've applied glue to.  Particularly on the edges, make sure you cover all the glue else you'll have shiny spots where the grass didn't cover the glue.
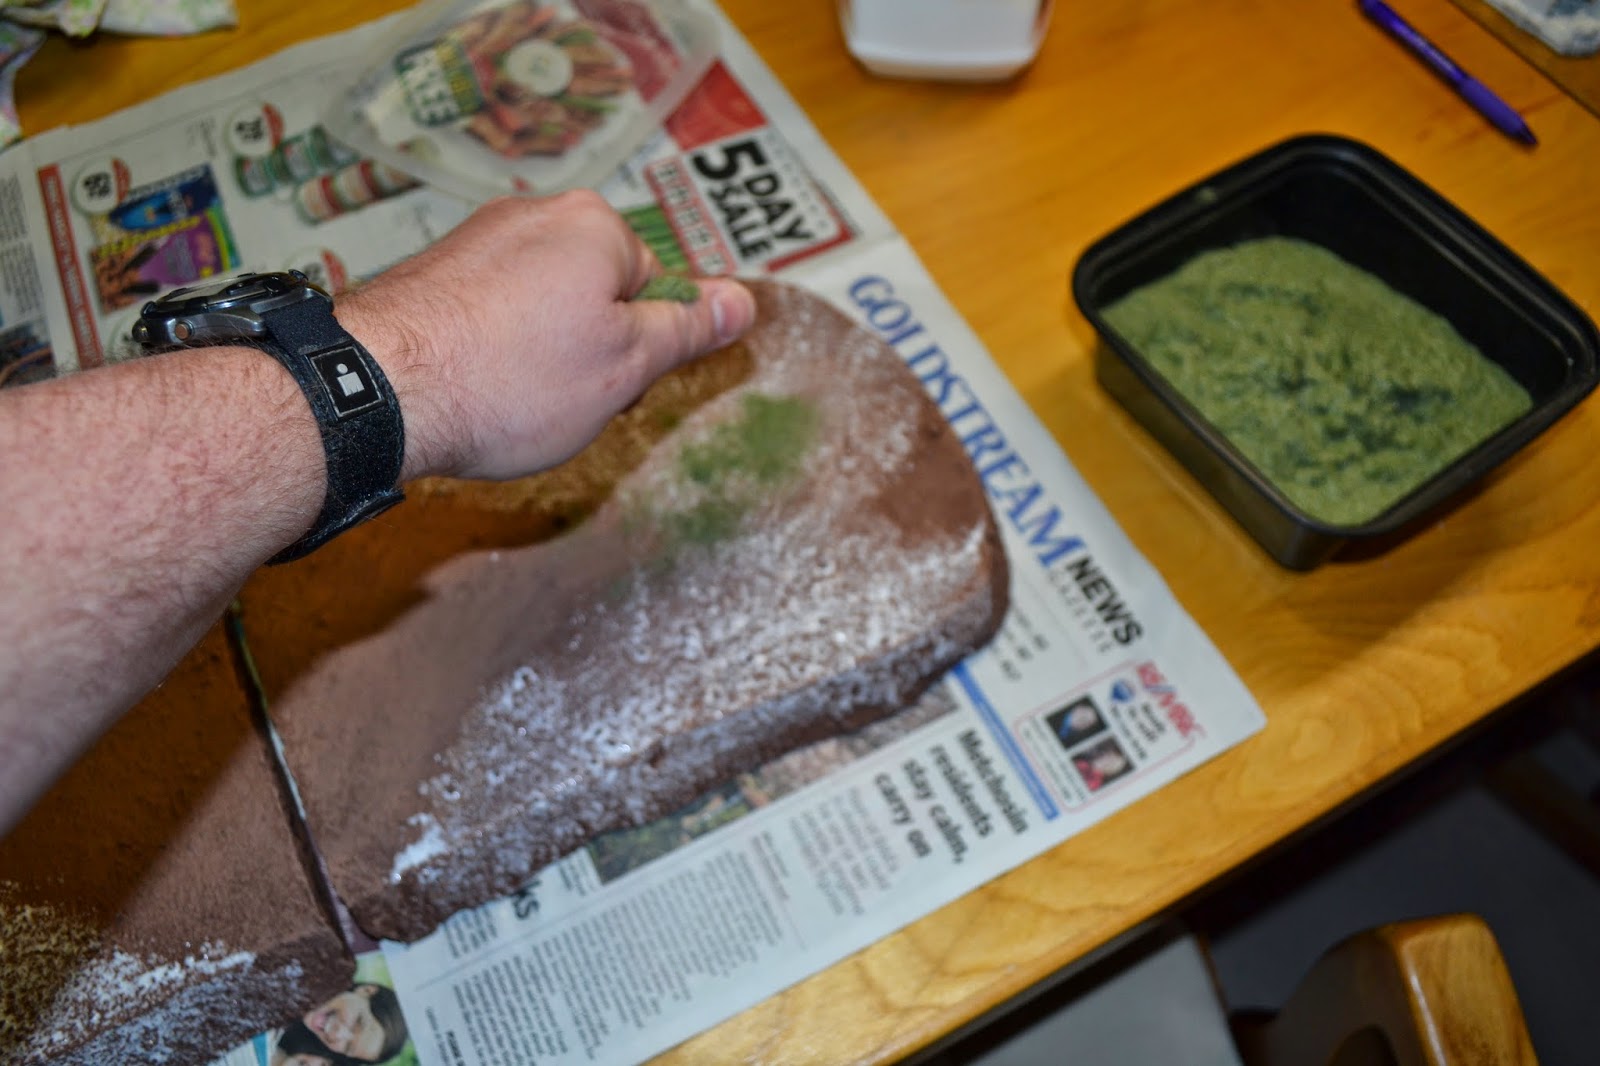


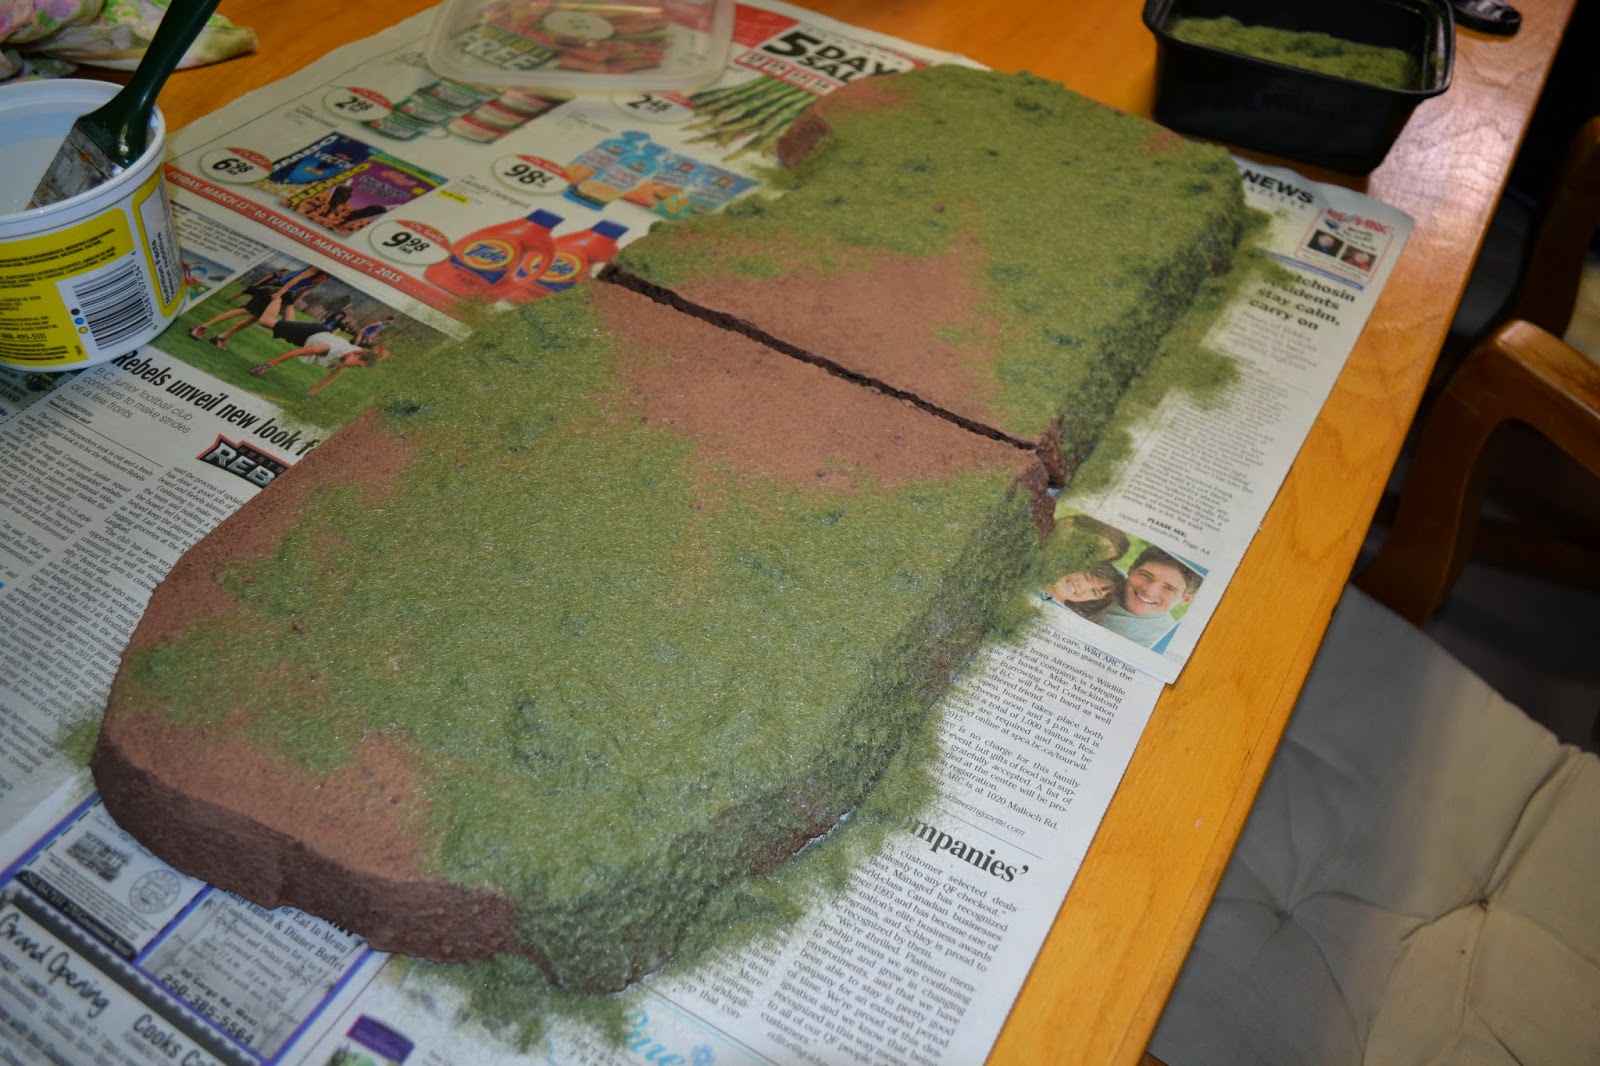

Now allow them to dry again.  I let them sit overnight (notice a trend here?).


Once the glue is dry, the simplest step begins.


Put a sheet of newspaper down with the fold up.  You'll see why at the end.

Now take your hill and dump off the excess, giving it a few gentle taps to release the unglued grass.


And there's the finished product.  I've placed it beside a completely different hill that I redid about a year or so ago with the same method.  Beside each other on the terrain board they look like they are from the same batch.


When you're done, just collect the grass in the fold of the newspaper and pour back into your container.


And there you have it.  A set of hills reconditioned to match my terrain set.  Elapsed time to build, about five hours over four days.  This would have been the same time even if they weren't reconditioned pieces.  The only difference is the jagged cliff area on the one hill, which was left over from before.


As I said, the variations are endless, depending on the colour of grass and paint chosen, as well as the geometry of the hills.  Another set of boards I made for my brother had the same surface treatment, but I used flock instead of grass to get a more northern moors style look.  Experiment, and let me know if you have any cool effects in the comments.  Also, put any questions in comments and I'll answer them as best I can.  Now go forth and make some land for your armies to conquer!

Monday, March 16, 2015

Reconditioning Terrain - Part One

As a side project while on leave, I decided to recondition some old wargaming terrain I had lying about. These hills are decent, made about twenty years ago, but show their age.  They're a bit faded, and the grass covering and the way they are sculpted is very 1990s.  Nothing wrong with that, but I wanted to update them and bring them into line with my more modern terrain collection.  This way everything will match and look cohesive.

As you can see, they're kind of squarish, and not that interesting.  Again, nothing wrong with them, but let's give them a nice, hard composite coating and update the paint to match the latest terrain boards, shall we?

First, get your materials together.  For this you'll need:

  • White glue - I recommend Rona or Home Depot and get the big jug.  Not only will it last you the project you're working on, I've had my jug since 2007-ish
  • Paintbrush (maybe more than one) - again, the building store.  You need a big one, and since it will handle glue, sand and paint it doesn't have to be high end.
  • Builder's sand - I bought the 30lb bag years ago and I've still not made a dent in it, despite basing legions of models, making 40 square feet of terrain boards, as well as some miscellaneous hills and other features.
  • Newspaper - lots and lots and lots of newspaper.  This WILL get messy.
Additionally, have a nice, open space to work on.  For me, the gaming table works well, but you could do it on the floor, outside, garage, large table, etc.


Don't forget the caffeine either.  

Make sure everything is laid out and you have plenty of room.  The newspaper should be double layer at minimum, quadruple layer is better.  This will get messy, and there's glue involved.  Don't say I didn't warn you.

Next is to take as much white glue as you think you need (it's okay to be conservative, you can always mix up more) and mix it with about one fifth of water.  You can play around with it to check the consistency, but it should flow readily from the brush while staying exactly where you want on the workpiece.


It's hard to tell from a still photo but the glue is slightly more runny than you'd get straight out of the bottle.  I use an old sour cream or yogurt container to mix in.  The advantage is that you can put the lid back on if you have to stop or are doing multiple larger pieces over several days if you don't have the space to lay them out. In this case, it's only a few hills so no problem with keeping extra glue mix.

Now you apply to the surface of the item.  This initial layer makes the terrain piece 'sticky' so that when you put the sand on it it doesn't go scattering all over the place.  As an aside, I chose not to change the shape of the hills due to a mix of nostalgia, laziness and the fact that stepped hills make for easier model placement during a game.  


Here you can see the initial layer of glue:

Now, it's time to add the sand.  Just normal, everyday builders' sand.  As you can see, the 30lb bag lasts for a long time.  I've kept it in an old cat litter bucket for ease of handling.


I normally sprinkle a good amount of sand over the upper surface of whatever I'm working on, like so:


The next step is where the magic happens.  Actually, not so much magic, but materials engineering (yeah, I had to throw that in there).  Once you've got a good bit of sand on, you get some extra glue mix on the brush and you pat it down so that you have a glue and sand slurry over the object you're making.  As needed, add extra sand and pat that down too.  You want to have a thorough mixture and a good coating over the entire workpiece.


You can see how the glue and sand forms a mix on the surface.  Don't be afraid to adjust the mix.  More sand makes for a more rugged surface.  Less sand makes the 'dirt' a bit smoother.  Make sure, as in the case here, to run your mix down the sides.  That way the edges of the hills are thoroughly covered as well.  Watch out for brushstrokes in the surface, as that will make it look a bit odd.  If you have to move sand around with your brush use a circular motion or move the brush from several directions.

A big benefit of this method is that the terrain pieces will end up with a nice, hard coating of sand and glue mixture.  It makes them quite durable, and if you're reconditioning old pieces like I am here, it will pretty much cover any previous decoration.  In this case it was a type of modelling grass that was very stiff and scratchy, not as nice as static grass.  Once the composite is on, you would never know it had a previous covering.

Once you're done all the pieces you want to do, lay them up somewhere you can let them dry for a while. Sometimes that will be the table or workspace, such as a full terrain board. Normally, I let them dry overnight, that way the glue has lots of time to fully polymerize before you do anything else with it.  In this case, I had a shelf that is destined to be moved upstairs, but for now it's empty.  I laid out some newspaper, as well as some old blister pack blisters:


The reason to raise the hills above the paper is to keep them from getting glued down.  As the next photo shows, gravity always wins so you will tend to have a little bit of pooling at the lowest edge.  


To avoid this, I put some blisters from old miniature packaging underneath the centre of each piece.


These have been set to dry overnight.  In the case of large items, such as a full terrain board, I've found a small, desktop fan can help.  That said, even on 2'x4' boards 24 hours has generally been sufficient.  Once that's done, the hills will be ready for painting.  However, that's part two...


Sunday, March 15, 2015

Reaper Bones II Kickstarter unboxing

My Bones II kickstarter rewards arrived from Reaper Miniatures the week before I went on leave.  Here's the haul:


Laid out, there's the core set, the expansion set #2 and some of the extras.

 
The 'Dragons Don't Share' box is super-awesome.  Not just for the dragon and ruins, but the adventurers are sweet sculpts.

When we open one of the boxes, we find ... even more bags of minis! This is the core set contents.


In the background my daughter is assembling her myrmidons for her Warmachine army, the Retribution of Scyrah.

Opening one of the bags, there pile looks even more impressive:

That'll take some painting.  I love what they've been able to do with the lighter material.  The large dragons (I test fit all the larger minis to make sure everything was good) are impressive and have some super-dynamic poses, which would be difficult if not impossible with heavy metal parts.  As much as I love metal miniatures, the bonesium material from Reaper allows their sculptors to make some sweet models.   I'm very happy with the batch, and look forward to putting them under my paintbrush.

Next up: part one of my work to recondition some old wargaming terrain.

Monday, March 09, 2015

Battle in the Glimmerwood

A fine battle was had this past weekend between my stepson and I.  His forces from the Protectorate of Menoth thought they could move through the Glimmerwood unchallenged, but they did not account for the Druids of Orboros.


Here we see some calculations after much 'jack bowling' was done.  It's impressive what a light warjack can do to a host of warriors when thrown through them with the full strength of a Feral Warpwolf.

Despite being initially set back on my heels in the early game (and set on fire a lot), I managed to endure the flame and finally take down Feora for the caster kill and the win.  Overall, it was a battlebox size game (only 14 pts) that we thought was going to be a quickie, and leave time for another game.  Instead, it turned into a 7 round beatdown with no quarter asked or given.  

Well played, Erik, well played, but you'll have to bring more to challenge the Devourer Wurm next time.  It was a great game, with each turn of each round pushing the 'lead' back and forth.  Just what a good game of Warmachine/Hordes should be.

Here's some detail of the next to last round, right before Kaya moved up to a better position, was charged by Feora who couldn't quite take her out, and the Warpwolf came thundering in to finish her.


Sunday, January 25, 2015

Writing Through

Just as I wrote before about outlining, now I’m thinking about the idea of ‘writing fearlessly.’  I can’t remember who I heard the term from, but after the last bout of writing, which felt like crap to start with but ended fairly decent (I think), I know what it means. 

It means to just write.  Put words down.  They may be/will be crap.  Or brilliant.  Or just more and more words.  Every time I’ve sat down and looked at a scene and said "how the hell am I going to sort that one out?" I’ve managed to just start writing.  Then, of course, I’d delete the sentence I just wrote and rewrite it.  Maybe I’d leave that one, then do (and re-do) the next.  The third one, maybe I’ll keep that.  The fourth isn’t bad either.  The fifth sentence; woah nelly where did that dialogue come from?   Ugh.  Let’s rewrite that, but the sixth is actually pretty good.  And so on.

Anything can be fixed.  That’s what I tell myself, and I’m quite confident it can be.  Maybe not enough on this piece of work, but on the next, and the next, and the next.  Practice and persistence.

Writing fearlessly means pushing through to the end and pushing aside those doubts and the need to constantly make it better.  Finish first, improve after.


At least with the outline, I know where I’m going, so I don’t have to think about what is going to happen in a scene.  I only need to fill it out and make the scene happen.

Monday, January 19, 2015

Fuegan, the Burning Lance

Another post with finished models.  While I didn't get much writing done in the last few days, I've been productive at the painting table.  Here's some shots of the Eldar Phoenix Lord I've been working on (by working on I mean that I did most of him a while ago, then finished the last few bits recently).

The photo setup isn't the greatest, but it seems to have worked with just a backdrop of white paper and the camera with flash.  I still need to trial some different methods of taking pictures of models, but for today it'll do as I've got a bunch of other things on my plate.


I'd say he looks pretty good.  For those who are interested, the main colour is P3 Khador Red Highlight.  The gun is P3 Blighted Gold (sweet colour for that ancient look) and the green trim is P3 Iosan Green.  It should be noted that the Space Marine helmet on the base is done in the colours of one of my most excellent foes, a Dark Angels successor chapter.  Fuegan has waded through many of those warriors, and it's a good way to 'poke' my friend, with whom I had a good narrative campaign going.  Also, the GW technical Blood Spatter paint makes for good blood dripping out of the helmet.

That's all for now.  More on the painting of a wizard character I have later.

Thursday, January 15, 2015

Comic book shelves

One of the projects I was working on around the house before I was deployed was a set of shelves to hold my comic book collection.  Turns out the design I worked out fit in the basement pretty well.  Sadly I didn't take many in-progress shots, but I was more concerned with getting them done (and the basement was a mess as I had to build and sort/shelve as I went).


It was designed to hold the long comic boxes (roughly 30 inches long), three per shelf.  I tested the first shelf just on two beams with three boxes, and I couldn't detect any sagging or deflection, so I know these are sturdy.

As it turns out, they also hold an assortment of other things, including Sterilite brand bins we picked up at Wal-Mart.  With three of these we have lots more storage, rather than the disorganized mess of moving boxes and other stuff.  Much better.  If the ceiling were higher I could put another row on top, but c'est la vie.  I'll have to wait until the next house.

Wednesday, January 14, 2015

Photo Box

Back again.  What a year!

Since the last time I posted, I was posted to HMCS Regina as the Assistant Engineering Officer, and deployed for NATO Operation Active Endeavour.  That took from May to September.  As a short notice posting it totally threw the plan for the early part of the year.  Believe me, when I came back from four and half months of 24/7 work, I spend my post-deployment leave thoroughly enjoying myself.  Good intentions to post notwithstanding, I didn't even get in any gaming.  I just spent time with my family, worked around the house and generally chilled out.

As the days go on, I'll put up some of the more interesting photos from our various ports of call.

However, for this post I'll show you the photo box I've made.  The plan for it came from Privateer Press' magazine No Quarter issue #53, dedicated to all things PP (Warmachine, Hordes, et al.).  The concept is to have a box, with paper sides, that allows the light to be more evenly diffused so that photos of miniatures look more 'even' and hopefully aren't tinted as much by the bulb colour.  So, without further ado, here's the glorious box (and the two desk lights that will be the first light sources):


Here's a look at the two miniatures without the benefit of a photo box.  This is just with the desk lights, though I did try to angle them beneficially for the light.


Now we have the same photo, only with the two of them in the photo box.


This photo is a bit dim, though the light is diffused and there are no glares.  I moved the lower lights so that they were down at miniature level.


This gives the final results:


It's better, but still a bit dim.  I'll have to play a bit with the combinations to see what lights up the models well but without creating the glare from the first photo.  At least it's a start.  Maybe invest in a higher power lamp too, but we'll see.

The box itself is just a moving box (almost rid of those!), with the sides cut out and tracing paper put over the holes.  I used tracing paper rather than regular printer paper as advised in the NQ article as I found I would have to overlap the papers to cover the hole completely.  I was afraid of either darkening the light or creating a shadow line in the photo.  I also didn't feel like buying a whole ream of 11x17" paper, which I can't feed through my printer and wouldn't really use for much.  Tracing paper I already had on hand.

I may need a smaller box, as this one might be too wide, forcing me to keep the lights too distant to avoid shadows.  If the sides of the box were closer, I could have the lights closer, even if I have to back them away from the paper a bit.  More experimentation is needed.

The models are characters I painted for my daughters in the Pathfinder Roleplaying game campaign we play at home.  Since I hadn't really photographed them before, and they're some fine looking minis, I figured they'd be good test subjects.

Fore those who care, the models are: 03574 - Juliette, Wizard (as my daughter's character Ezreth) and 03566 - Valloa, Elf Thief (as my other daughter's character Merisiel), both in pewter from Reaper Miniatures .

Next up will be some larger models.  Maybe some warjacks will do better in the larger box.

After that, some photos and drawings of the comic box shelves I built over the last year.

Tuesday, April 08, 2014

Unboxing the War Chest

Posts have been scarce lately.  We've had our kitchen redone, an exchange student come to visit and all the ensuing cleanup, reorganization and other stuff.  Frankly, it's been crazy around here, but the good kind.

However, since I just got my Kickstarter backer reward from the Warmachine Tactics computer game, I thought I'd post up the unboxing.  Especially since the war chest is only now reaching backers.

It's a pretty beautiful piece of work, but let's get on with the photos, shall we?

First, the box.  Well, the mailing box.  And another box inside the box. (Rather well packaged, actually)

My Ironclad warjack wanted to check it out too.  Either that or he just wanted some attention and paint.
Next we open the box, and find, another box!  Only this one is wooden, with sexy sigils on the front.

Very nice.  The gold is thick too, not just a brief dusting across the top.  Ironclad approves!  Inside, there's a large foam sheet.  We pull it up and...
(he's very curious, that Ironclad)

Inside, that thick foam holds in place all the goodies.  There's a coin for each faction's journeyman warcaster, as well as one for Tactics and an additional one for the alternate Sturgis sculpt.  Each of the journeymen models (and the extra bits for evil Sturgis - those and the extra coin I added as additional rewards) are tucked into the cubbies in the lower foam.

Everything arrived super safe, and all the parts are there, which I checked shortly after the photo above. Ironclad can vouch for me, he was watching the whole time.  You can see the special edition dice (which has Cygnar on the six, of course, as that's the way it should be)

Also included were the patches for journeyman and mage, as well as a rather nice thank-you postcard.  All the cards necessary for the models are in there too, including duplicate Sturgis ones (Cygnar and Cryx).


The design of the whole box is pretty sweet.  The lower foam is the harder kind, and you could put your limited sculpt models in there with the coins.  I might want to add some softer foam if they were fully painted, but I doubt this set will see a lot of bumping and jostling, so not a big deal.  The circles for the coins look large enough to hold the coins even if you had them in those plastic coin protectors, so that's pretty cool.  

Here's a shot of the coins themselves.  They are probably the most beautiful part of the whole package.  I admit I just took the photos on my desk, so the quality may be lacking.  I also left the coins in the plastic for now, as I plan to get some protectors in the near future.

And finally, the models in all their glory (unassembled for now, will get on them when I get my gaming table back from the heaps of stuff on it at the moment).

Ironclad agrees; the War Chest is pretty awesome.  (Now paint me!)

I'm looking forward to getting the models together and giving them some paint.  Unfortunately, I'm posted to HMCS Regina in a few weeks, so will have to wait until I get back before I can really give them a go.

Until then, there's a brief preview of the Warmachine Tactics Kickstarter War Chest.  

Monday, February 03, 2014

Ads done right

Due to a lack of other content, I present an ad that totally gets it right.  I'm neither fan nor foe of Nissan in particular, but anytime you put zombie snowmen and a faux-Zimmer soundtrack, it's probably going to be pretty cool.


That's all for today, as it is the Monday of housework and other miscellaneous chores.