Showing posts with label wargames. Show all posts

Thursday, November 29, 2018

Painting progress

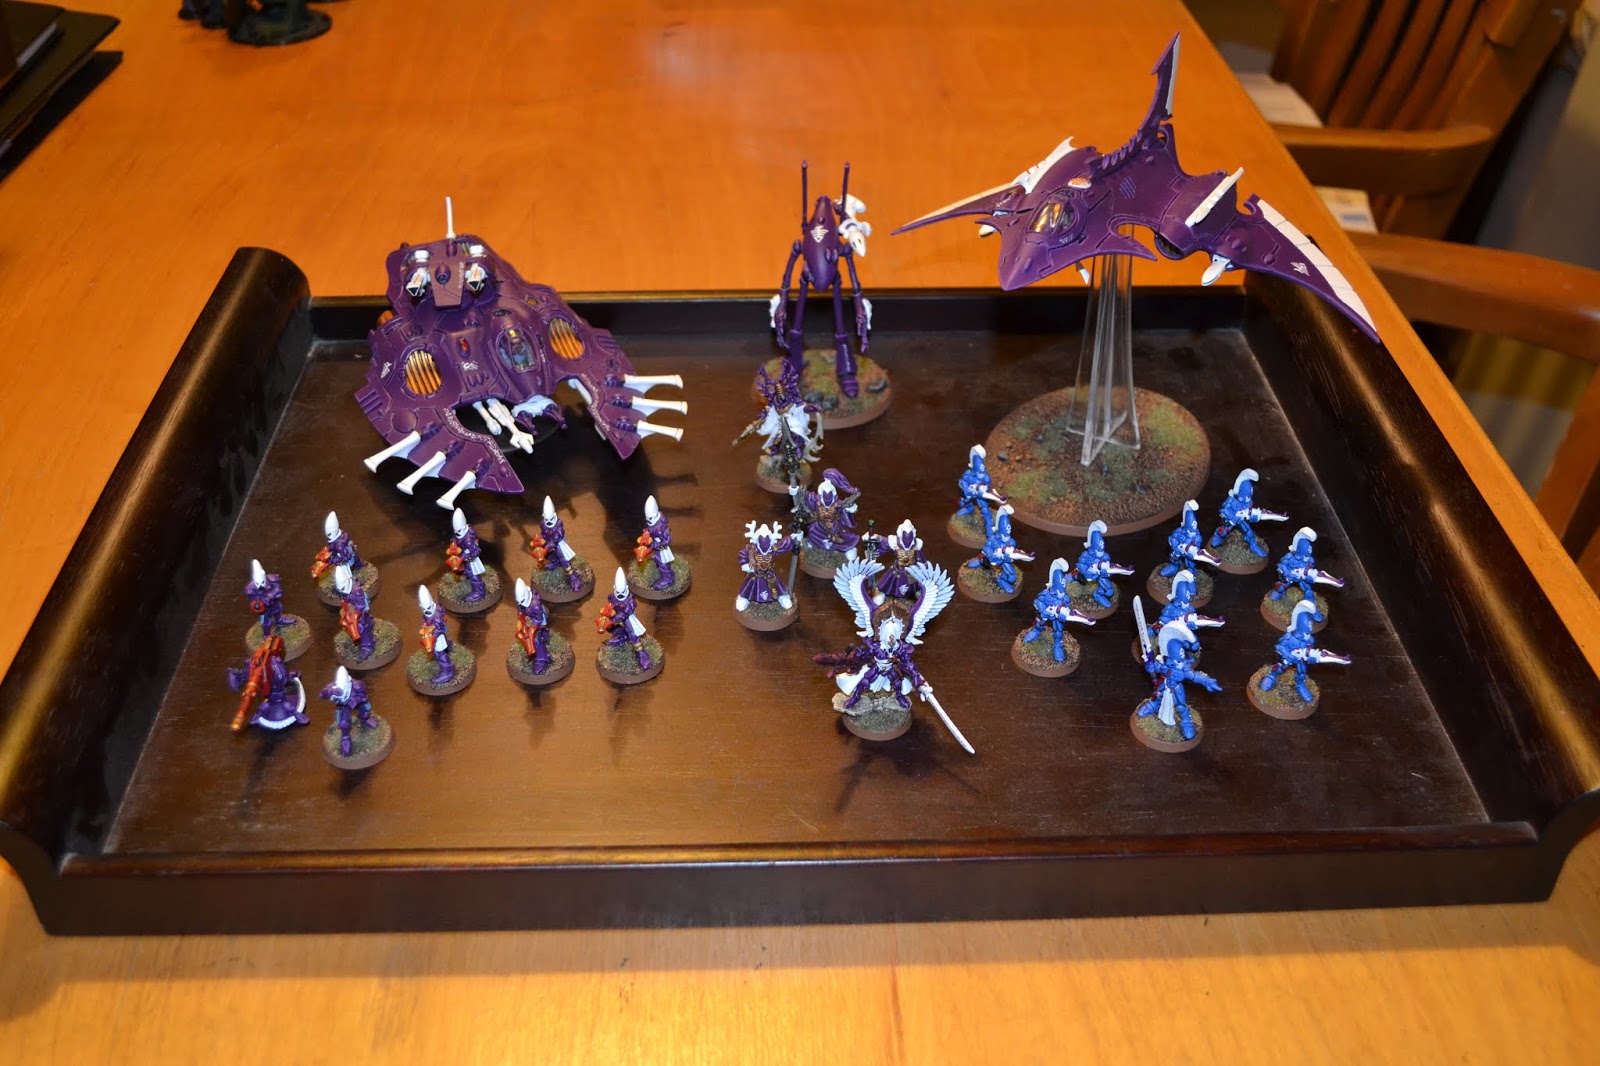
Over the last few weeks I've made some progress on painting.  First up is the finally-finished Eldar Hemlock Wraithfighter.  It's on the far right, and pictured with the 1000 points of Eldar I've been working on for the Warhammer 40k builder's league at our local game shop, Everything Games.


Doing this builder's league, for me at least, was a way to push more painting, and get more models done.  Given that the league is over, but I've managed to paint quite a few things, I'd call it a mixed success.

A closer look at the Hemlock, showing the painted cockpit.  This model fits together great, but those smooth, curvilinear surfaces take a LOT of coats of paint.  Will have to use an airbrush for future models like this one.  Still, it turned out rather nicely for the efforts.


However, there's still more to do to finish the 2000 points of models for the league (or, more appropriately, my own goal).


That whole shelf needs to be done, less some of the unprimed guys at the back.

However, for now I'm working on a bit of a palate cleanser, a mini for my D&D warlock character in the campaign we play weekly after work.


He's coming along nicely, and it's always refreshing to paint a model that is more 'freeform,' in that there's no uniform, no specific colour scheme, just a chance to play with colour choices and painting techniques.

After this guy, it's back to the grind with my team of Imperial Guard for the Kill Team game, as well as the ruined building terrain pieces (one of which is pictured behind them, sprayed grey for a basecoat).


After that, maybe back to a dragon I had started before the builders' leagues took all my painting time.


She'll be a green dragon, though I've always liked the Larry Elmore style contrasting belly scales, so I went with a nice, deep yellow.  The base and wings are in front, separate so as to get all the hidden areas.

Along with all that, there's the Age of Sigmar builder's league, so I've got a bunch of Seraphon to paint up for that one...

Thursday, February 23, 2017

Ironclad approved

Over the last few months (and by last few I mean September and onwards), I managed to get a fair bit of painting done.  That, of course, when I wasn't working, doing family things or otherwise engaged.

From the cabinet comes my warjacks from the journeyman league last summer, who contributed to my 'best painted' award at the end.

For starters, the Ironclad.  A heavy warjack with a quake hammer and open fist.  The colours are very traditional Cygnar, which is one of the things I was initially attracted to.

The blue is the Cygnar Blue base shaded first with Exile Blue then Exile and Umbral Umber.  Careful on the blue/brown mix as you want to avoid muddiness.  Then use Cygnar Blue Highlight in several layers (increasing the mix of highlight until you're pure Cygnar Blue Highlight) with a finish layer of Highlight mixed with a touch of Morrow White.

The gold is Rhulic Gold shaded by brown ink/Sanguine Base mix, then some Umbral Umber into that mix for a final wash.  Clean up with Rhulic Gold again and highlight with Shining Gold.

The steel portions are pig iron followed by a mix of Exile Blue and Armour Wash.  Add in some Umbral Umber for a final shade (not too much or it gets 'muddy' looking).  Highlight with Cold Steel and Quicksilver and done!

Normally I paint from the inside out, meaning the areas recessed farthest in get done first.  In this case it was eyes and boiler grille first, using Heartfire and Ember Orange to give it a warm, firey glow.  The arcane bits in blue on the hammer are Arcane Blue with blue ink and Meredius Blue, using Morrow White for the mix.  Dials and gauges on the back are Hammerfall Khaki  with Morrow White.

The Cygnus on the hull was tough as yellow is a pain in the butt sometimes.  However, keeping the paint fluid and gradually building up from Rucksack Ran to Cygnar Yellow and beyond with Menoth White Highlight made it stand out nicely.


The bases on all of them are a wet layer of Umbral Umber (somewhere between a wash and paint) to get into all the recesses.  This is followed by a heavy drybrush of Bootstrap Leather and a final touch of Rucksack Tan.  Two thin lines for front/back facing and a cleanup of the black rim and the base is done.

Here's his buddy the Charger, a lovely 'jack with a dual cannon and a hammer for squashing those who get too close.  Same techniques on this one, and I think he looks rather spiffy.  Ready to lay some smack on the enemies of Cygnar.


Finally, a group shot with Major Beth Maddox.


And two more photos of the warlock mini from the previous post.  A bit better photo quality.


Monday, December 05, 2016

Warcasters and other miniature goodness

Another hiatus, and another long dearth of posting.

For those who might care, it happened that my later summer/fall got slammed with waaaaay too much work.  After my boss retired I took his duties for a month or so, then went full bore into teaching for 6+ hours a day, every day for most of October and half of November.  I'm still digging out from the pile, but am managing to leave (mostly) on time.  It's been a treat.

That said, prior to the madness, there was a Warmachine/Hordes Journeyman League held at Everything Games this past summer to coincide with the release of the Warmachine and Hordes mark III rules.  As such, my youngest and I participated in the league and had an absolute blast.  For those not in the know, a Journeyman league involves building your force from a starter box (essentially one warlock/warcaster and from two to four warbeasts/warjacks) to a mighty army of 75 points.  It also served to bring us up to speed on the new rules which, while not super different from mark II, had a few key changes.  Mostly, it sped up gameplay and made for more aggressive maneuvering and action, so overall, mark III gets a resounding thumbs up.

The league gives points for defeating opponents as well as painting miniatures over the course of the league.  You get a point per week for each win, as well as a point for having more painted (that means completed) models than the previous week.  The scenarios change as well, forcing you to give up your one-trick tactic and do something different.

Overall, a lot of fun, and I met a lot of cool players at EG who I would happily cross swords with again.  Sadly, the final tournament didn't happen as only three people showed up.  However, my youngest daughter took the Destroyer award (for most games won) while I took the Creator award (for best painted).  Out of a field of 20 or so, I'll take that!

Speaking of painted, I made good progress on my models for my Cygnar force.  First off is my warcaster, Major Beth Maddox.  She is new to the mark III release, and while it took me a game or three to start getting the hang of her gameplay, she turned out to be one of my favourite warcasters.


As a Stormblade turned warcaster, she is full of electro-goodness.  This gives her good synergy with other units, such as Stormblades or warjacks like the Firefly.  Frankly, she does a great job supporting an elite troop and several warjacks, by the end of the league I was really enjoying her and her battlegroup.

I do need to work on a better photo setup though.  Ah well, one thing at a time.

More model photos to follow, and a dissection of the list I finally developed during the league.

Saturday, February 13, 2016

Another Unboxing - Stones Dungeon Tiles

So today I got another Kickstarter rewards box.  Actually, thanks to Canada Post's ineptitude, I had no idea they tried to deliver my box until I did a tracking lookup.  Thanks, Canada Post, thanks for nothing.

So, Frontline Games had a Kickstarter for a set of Dungeon Tiles.  These are 2"x2" tiles that can be used to make rooms, halls, or other layouts primarily for roleplaying games.  Given that Pathfinder and D&D both use a 1" grid (and the tiles are marked in 1" increments), this looked pretty cool.  Well, they added other trappings such as columns, doors (which open) and other dungeon dressing, I threw some support at their kickstarter.  Nothing crazy, but I figured it would be a cool set, and maybe look at adding more as they ramp up production.

Today, I unboxed the lot.  Here's the sum total:

Inside the box is the hundred or so tiles, plus some single doors.


So far so good.  Everything is there as promised.  Nicely packed too, so no damage.  Opening one of the bags of tiles they look pretty decent.  You can readily see the 1" squares, cleverly integrated into the design.


The tiles are double sided as well, with the alternate side being more of an earthy look.  Not bad, and it continues the grid for ease of play.

Laying a few out, gives a pretty good looking play surface.

These are definitely going to need a scrub, as you can feel the mold release agent.  That's okay though.  No real surprises there.  I opened one of the bags of doors, and the doors come in two pieces, the door and the frame with the bottom lintel.  There are small magnets in the kits to glue in to the bottom of the door where it would pivot, which should make them much better looking and able to open to represent the progress of a party of adventurers.

As you can tell by the door frame, some boiling will be necessary to cure the bends and warping in the parts, but again, no surprises there.

So far, looking like a cool product.  For now, I'm leaving them packed up until I can get some scrubbing done.  In the bunch there's some columns, beds, tables, crates, chairs and other dungeon dressing.  Many of these will also be good for wargaming.  Once I get them out of their packages, scrubbed and ready for some paint, I'll post more on how they clean up and paint.  More to follow.

Thursday, February 11, 2016

Firestorm Armada Scenario - Break the Conference

Here's a Firestorm Armada scenario we played a few weeks ago.  Written by me and playtested by myself, my daughter and stepson, we had a blast.  It started as an idea for how to have a three-way game that wasn't two-on-one, but had a real purpose as opposed to everyone just randomly blasting each other to pieces (not that that's necessarily bad).  We played it, and made some tweaks as we went, and the result is:

Break the Conference Scenario (by Rowan Wilson)

 A secret meeting in deep space between two rival powers has been discovered by a third.  Not wanting them to come to any kind of agreement, the third party plans to sabotage the conference and wipe out the attendees.  This should cause enough animosity between the two that any kind of accord will be impossible for years to come.

Number of players: 3

Organization:
·         Two players are the defenders.
·         One player is the attacker.
·         Each chooses a fleet up to the agreed points value (for three players, recommend patrol fleets).
·         The defenders each have a civilian ship (stats given below) that holds their conference attendees, at no additional points cost.  If desired, the player may detach escorts from one of their capital ships to the civilian ship (choose at the start, the escorts stay with their new ‘parent’).

Setup:
·         Each of the defenders chooses a corner of the battlefield.  That is their ‘home corner’ to which they must retreat.  Their ‘edge’ extends 12” from the corner on either side.
·         The attacker uses the middle of the opposite side as their table edge, and may enter over a 24” span.
·         The defenders’ civilian ships must be set up in the center of the board as shown.  The defenders’ fleets are set up in a 12” box, one side centered on the civilian ships but displaced 6” away from the center.  They may only leave up to 25% of their fleets in reserves, if desired.
·         The two civilian ships are in base contact, to facilitate their short range shuttles, however may face any direction.
·         The attacker enters the table as per the reserves rule, however the attacker begins rolling for reserves on Turn 1. 
·         Scale the battlespace proportionally for larger or smaller tables.


Game start:
·         Before anyone rolls for initiative, the attacker makes one attack on each civilian ship from the other one.  (i.e. make a 4 dice attack on each civilian ship), to represent their sabotage taking place.
·         The defenders may not fire at either transport in turn 1 as they do not wish to risk hitting their own ship.
·         Roll for initiative for each player, play for that turn proceeds as normal.  If two players tie for initiative, roll-off for that initiative choice.
·         The civilian ships act as a squadron on their own.
·         No ships may shunt in or out of the battlefield.  The location was chosen to prevent such surprise attacks.  Vessels must either leave the play field (count as destroyed), or depart their player’s table edge (do not count as destroyed).
·         Ships of either side may start the game halted (no minimum move, but will need to start moving to turn).

Victory Conditions:
·         Each player scores victory points as normal for destroying enemy vessels as well as losing their own.  Maintain battle tracks as normal, paying attention to which player destroys which vessel.
·         The following additions to the battle log are to be used:
o   Defender’s civilian transport escapes their own table edge: +5
o   Defender destroys other defender’s transport: +3
o   Attacker destroys any of the defenders’ transports: +4/transport
o   Losing your transport: -3
o   Attacker does not destroy any transports: -4
o   Capturing a transport: +5
·         At the end of the game, the winner is the one with the highest battle log.  The game is played until both transports are destroyed or removed from play.

Civilian Transports:
(Recommend use of Ares class luxury liner model)


We played with Terrans (me) as the attackers, Directorate (daughter) and Sorylians (stepson) as the defenders.  Initial surges by the Directorate and Sorylians led to some serious damage, while the initial Terran advance was obliterated the turn they arrived (just a squadron of frigates).  Later Terran arrivals were able to put paid to the transport ships after doing some serious damage to the other two fleets.  A fun game and having the scenario made it more interesting, as there was a clear goal to seek in the battle.

The only sad part was we didn't get any pictures.  I was more interested in crushing Directorate and Sorylian forces.

I recommend trying it out, if you play Firestorm Armada (and why aren't you?).

Let me know what you think of the scenario in comments.  

Tuesday, August 25, 2015

New Library

The move is done, things are sorted, and the house is almost fully put together.

Considering here I wrote about the 'Geek Cave' that I had built in our old house, I figured it was time to show the new work area.  After several (where several = five) iterations, I determined that there was no way to have the gaming area in the library.  However, since this is the west coast of Canada, the garage will do nicely for gaming.  Considering the heat we've had this summer, it was nice to be able to open the huge door.

At any rate, here's the view coming into the library.

Moving in a bit, we see more of the shelves with Cygnarans and about half the library.  The center shelf under the light cuts the room in two.
A quick turn to the left shows the desks (painting and writing).  As well as the obligatory cat in the office chair (hi Cassandra!).  Lots of Warhammer miniatures back there, and I finally have power to the lights in the miniatures cabinets.
Moving in past the office chair leads to my reading chair, with another cabinet of miniatures.  It's a bit of a tight fit, but the chair comes out if I need to really dig back there.
Turning around we can see a view from the chair.
And a close up of the two desks.
 Note the cats lurking on the chair (Cassandra) and under the painting table (Oliver).  House beasts in their natural habitat.  This is more detail into the other half of the library, and if you look closely past the empty miniatures cabinet (soon to be filled with painted goodness), the door beyond leads to a bathroom.
With a shelf, of course, because that's what library bathrooms should have.
Looking out from the bathroom, the rest of the library.
And finally, in the garage, the gaming table, with stereo system and refrigerator.  Also, some newly painted space battle boards for the Firestorm Armada game.  More on that one later.
Not like we put cars in the garage or anything.

More house beasts lurking about to see what's going on.  That would be (L-R) Tyr, Cassandra and Oliver.

Finally, Mr. Tyr is wondering why I'm aiming the silly device at him.

That is my writing, painting and gaming space.  Already the gaming table has been blooded with wargames and RPGs, there's work in progress on the painting table, and I have my notes for Queen's Legacy.  Now I am unstoppable! (with feline minions too)

Monday, March 23, 2015

Reconditioning Terrain - Supplemental

Having just done a bunch of hills, I applied the same techniques to one of the older terrain boards I have.  This board is 2'x4', and was made a few years ago for me as a gift by my brother.  As cool as it is, it has taken a bit of a beating due to two moves and various forms of storage.  Thus, I figured I'd give it a makeover, and make it a bit more durable at the same time.

Here you can see the board, which is fully grassed and has a nice hill feature built in to the corner.  The grass was just glued down to the painted surface of the board.  This looks good, but the board has a few chips and dings, as well as it's lost a fair bit of the grass.


Next up is to give it the sand and glue treatment.  A big difference here is that the static grass acted like a sponge, soaking up the glue as soon as I put it on.  I had to cut the glue with significantly more water than normal in order to get it to cover.


In fact, because of the extra water it took two days to fully cure.


But it eventually did.  I found a fan was helpful to move the air over the board and constantly provide fresh air to it.  Now it was time for the black paint.


Once a nice coat was on, it was time for the brown.  In this case, since the Folk Art brand had discontinued my previous colour, I took a colour swatch to Rona and got a quart of matte finish latex.


Two highlights later, and the dirt is done.


Now we'll add the static grass.  To keep the original character, I went with three colours, as well as the leftover mid-green from the last boards, and concentrated the colours in various areas for some gradation, to keep it visually interesting.


Allow that to dry overnight and then shake the excess off.


And voila.  For less than an hour a day, some setup and some drying time, half a Warmachine/Hordes game board.  I'll add photos the next time I have them set up for a game.